


Due to the recent virus scare in our world, more and more people are choosing to stay at home rather than go out. This is a good strategy for avoiding crowds, but the question arises as to what to do with all of that ‘at home time’. Here’s one option: how about you learn how to make a delicious bread that requires no technical knowledge, no special ingredients, is fun to do, and tastes delicious?
If you thought you’d never be able to make an artisan loaf of bread at home with a crisp crust, soft center with big air pockets, and an amazing flavor, I’ve got good news – yes you can and it’s easier than you could imagine. In this recipe, you spend five minutes mixing the dough the day before and allow for a slow room temperature rise overnight. No kneading required! The next day, just form the loaf and let it rise again, then into the oven it goes. An hour later you have a delicious loaf of bread. More good news: This recipe is very forgiving, so no worries about making a mistake. The recipe says to let the mixed dough sit for 12-18 hours. I’ve let it go for 24 hours with no problems. In fact, the last time I made this, we lost power at our house during the last 15 minutes of baking. I just let it sit in the oven for that amount of time, and it turned out beautifully. Make it plain or add chopped olives or some cheese for fun. Life doesn’t get much better than that.
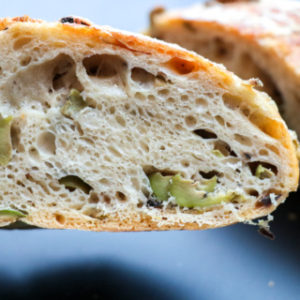
And it all starts with the dough…weigh the ingredients please if you can. You’ll have a much better result due to the importance of the flour to water ratio of it all. This will be a sticky dough, which makes it all the better than you don’t have to knead it. Just add the ingredients and stir. I always put olives in mine just because I’m an olive lover, but feel free to omit if you want. Toss it in a bowl, cover with plastic wrap, and let it do its own thing for from 12-18 hours (or 24 if you have to with no problems as far as I can see).

After the first rise, just gently coax the dough onto some parchment paper that has been floured, then try to form it into as close to a round shape as you can. PS: If you don’t have parchment paper, you can just use aluminum foil. Actually, I haven’t tried it with foil, but can’t imagine why it wouldn’t work. Generously flour the top the bread, let it rise for another hour and into the oven it goes. One important thing though – you will need a Dutch oven for this recipe. The whole idea is that you preheat the Dutch oven for half an hour at 475 degrees – screaming hot, before baking.
OK, don’t panic at this next part, but you will need to be careful because I don’t want you to end up getting burned. CAREFULLY remove the Dutch Oven from the oven, take off the lid, and VERY GENTLY lift up your risen dough (I usually grab the parchment by all 4 corners) and again VERY GENTLY place it in the Dutch Oven. Put the lid on and pop it back into the oven for 30 minutes. A word of caution: When the Dutch oven comes out before the dough gets added, and after the bread is done, be sure to put that hot pan on a cooling rack or something else that will protect your countertops. I didn’t think about what I was doing the last time I baked, and ended up with scorched rounds burnt into the top of my wooden island. This was idiotic, but can hopefully be sanded out before my husband notices.
No peeking for 30 minutes, then CAREFULLY remove the Dutch Oven from the oven, take the lid off, and put the bread back into the oven for another 20-30 minutes.
Start looking at him seriously after about 20 minutes because he’s nearly done. I like to go about 30 minutes, but every oven is different. Technically, this bread should be done when an instant read thermometer reads about 210 degrees. I like to go a little higher, maybe 215 but that’s just me. If you don’t have a thermometer, trust your eyes. If it looks like this, chances are he’s ready. If it’s not quite how you like it, just leave in for five more minutes next time.
 This is too cool! When your bread come out of the oven, just stand there and listen for a minute….it will start talking to you: crackle, crackle, crackle. This is the sound of the crust contracting as it cools and is always music to my ears. Gently lift the bread out by the corners of the parchment and cool on a cooling rack until you can’t stand it anymore. But really, you will be happier if its 100 percent cooled before diving in.


It’s all up to you at this point – eat it as is, slather with butter, melt some cheese on top or whatever you feel like. I’m a butter fan myself, big shock.


Hope you have as much fun with this as I do!! Happy baking, and thanks so much for reading today. xoxoxo
Thanks so much for dropping by. Hope you can join us again next time!
No Knead Artisan Bread
Ingredients
- NOTE: If at all possible it’s really important to weigh your ingredients rather than just measure. It all has to do with making sure the amount of flour to water is correct to ensure a good, light loaf of bread)
- 400 grams Bread flour 3.15 cups
- 1 teaspoon yeast
- 1 teaspoon salt
- 300 grams water about 1-1/3 cups
- 200 grams roughly chopped olives 1 ½ cups (optional)
Instructions
- Combine all ingredients in a large bowl and stir to mix. Cover tightly with plastic wrap and let sit at room temperature for a minimum of 12 hours and up to 18 hours. NOTE: Time has gotten away from me a time or two and I’ve let this first rise go for 24 hours – no problem.
- Scoop dough gently onto a sheet of well floured parchment paper. If you don't have parchment paper, it's fine to use aluminum foil. Coax dough into as close to a round loaf shape as you can get. Generously sprinkle flour top of loaf, cover with a light kitchen towel, and let sit in a warm place for one hour.
- After dough has risen for 30 minutes, place a 6-quart Dutch Oven (and lid) into your oven and set the temperature to 475 degrees.
- After dough has risen for a total of 60 minutes, remove hot Dutch Oven from oven and place parchment and dough directly into the Dutch Oven. Put on the lid and return to oven. Bake for 30 minutes. BE CAREFUL!! That Dutch oven is super-hot. Make sure you put the hot pan and lid on a cooling rack or other non-meltable/non-burnable surface when adding the dough. I forgot to do that last time, put it on my wooden kitchen island and now have big circular burn marks on it to show for my lack of good sense.
- After 30 minutes, remove lid and bake bread for another 20-30 minutes. Crust will be deep brown and internal temperature should read 210-215 degrees.
- Cool thoroughly before slicing.