Focaccia Pizza
We are living in unusual times, aren’t we? How has your life changed? For me, a lot of it is about missing the little, everyday things we all used to take for granted. For example, one of my favorite activities is grocery shopping. I know – how strange can you get? But for me, it’s always been like a competitive sport. I love searching the aisles for new products, the freshest produce, the best deals, and will also admit a love of snooping in other customers carts to see what they were buying. When all the recent panic buying started, I was interested to see what people were piling into their shopping carts. My neighborhood store did a good job of keeping most shelves stocked, but one item that was nowhere to be seen was frozen pizza. That got me to thinking…. since everybody is spending more time at home, maybe it would be fun to share a recipe for a super easy do-it-yourself focaccia pizza that lets you top it however you want? Here we have it: Focaccia is a lot like pizza, but a whole lot less fussy. Focaccia dough tends to be thicker and lighter than traditional pizza dough, but the ingredients are pretty much the same. The main difference is that focaccia uses a lot more water in the mix, creating a very wet dough. This is a plus for us, because wet doughs have enough moisture in them to replace the process of kneading (a bunch of science is behind this which we are not in the mood to learn at the moment, so let’s just go with it for now). In this recipe, we mix the dough together (no kneading) and toss it in the refrigerator overnight. This allows the dough to pick up a lot more flavor and overall personality. The next day, you’ve got a couple of choices. You can either spread the dough out in a 13x9 inch pan, or form two, 12-inch pizzas. Top with what you like, pop it in the oven, and enjoy. All the fun and flavor of pizza, with a lot less fuss. Let’s be kind to ourselves during these crazy times, and pizza seems like a pretty good place to start.
Ingredients
- FOR THE FOCACCIA DOUGH
- 500 grams or 3 2/3 cup bread flour
- 5 teaspoons instant yeast
- 1 teaspoon sugar
- 6 tablespoons olive oil
- 2 teaspoons salt
- 1 ¾ cup water
- FOR THE TOPPINGS
- Note: These are the toppings I used but feel free to use whatever suits your fancy. The only guiding hint here is: Less is More. You don’t want to put so much stuff on top of your dough that it gets weighed down, so just be a little bit careful.
- Approximately 2 cups shredded mozzarella cheese Swiss cheese and Provolone work really well too
- 1 cup shredded Machengo or Parmesan cheese seriously – use whatever you like
- 1 onion sliced and sautéed until lightly browned and soft
- 1 orange pepper sliced and sautéed until soft
- 1 jar roasted red peppers you’ll only need 2 peppers, sliced thinly
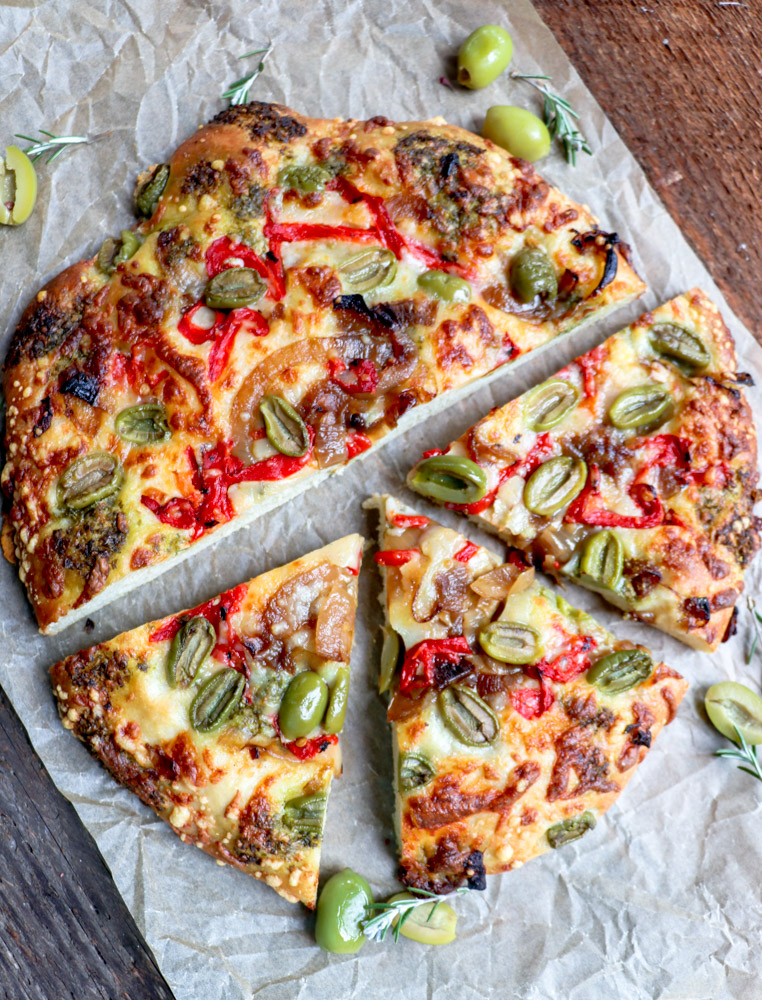
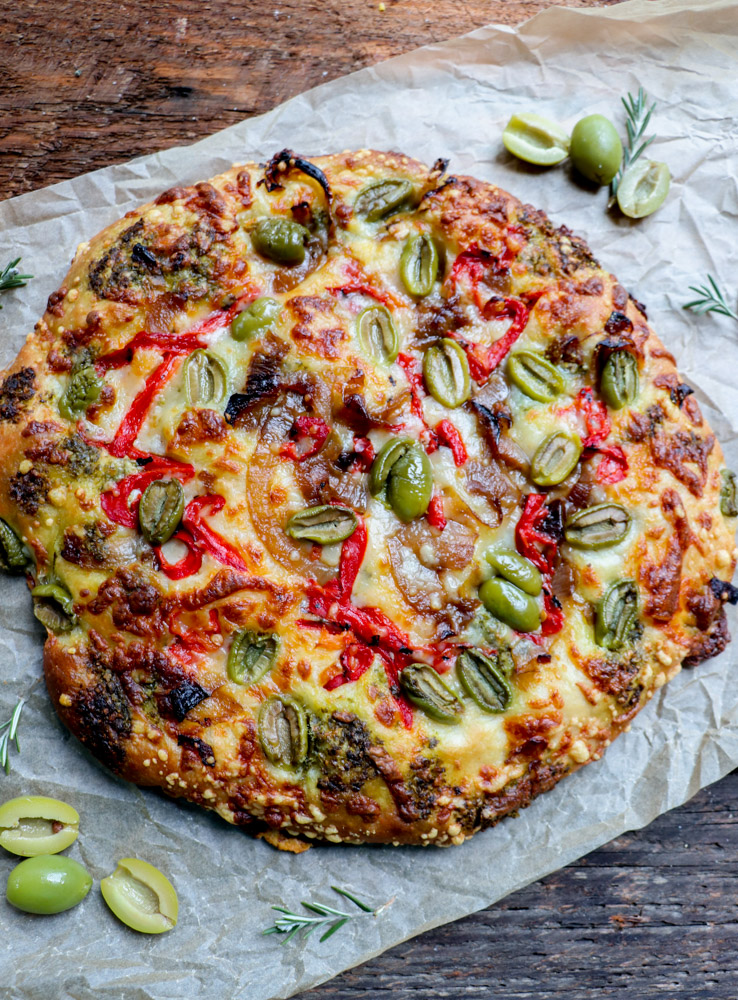
- 1 cup pitted green olives sliced in half
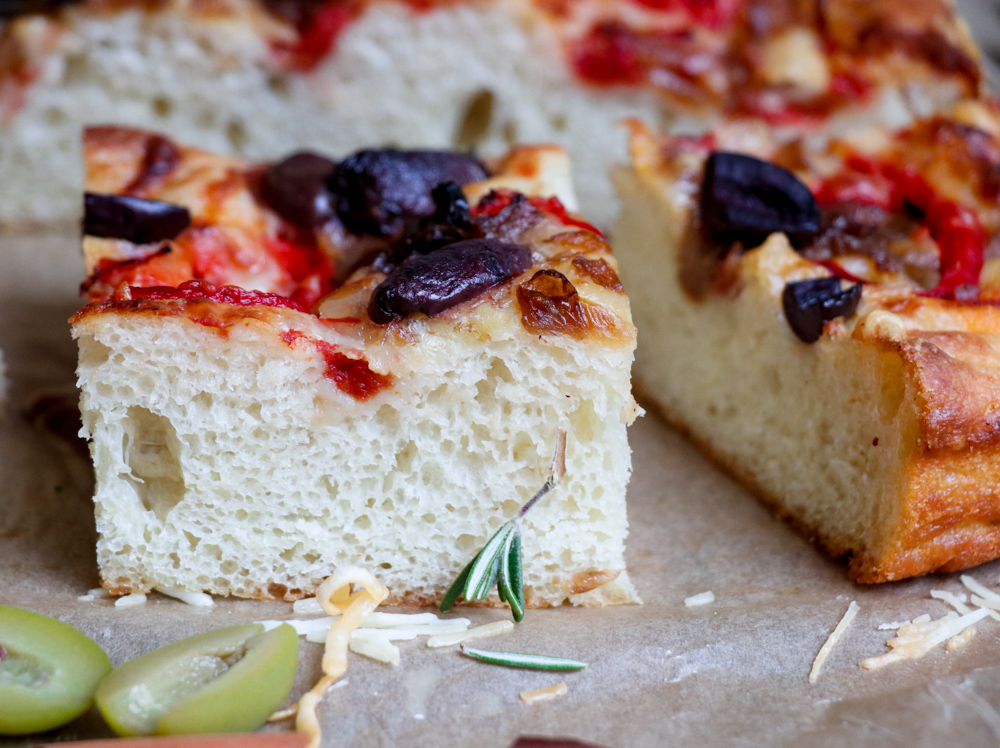
- 1 cup pitted Kalamata olives sliced in half
- About ½ cup crushed tomatoes
- About ½ cup pesto optional
- 2 tablespoons of your favorite Italian style herb blend choose from oregano, marjoram, thyme, etc.
Instructions
- FOR THE FOCACCIA DOUGH – DAY 1
- In a large bowl, mix together the bread flour, yeast, sugar, 2 tablespoons of olive oil and salt.
- Add the water (start with about half of it, then mix and add the rest) and stir (or mix with a stand mixer) until the dough is fairly smooth.
- Pour 2 tablespoon of olive oil into a large bowl and swirl around to make sure you have oil on the bottom and sides of the bowl. Scoop the dough – which will be very wet so don’t panic – into the bowl. Drizzle a little more olive oil on top and cover with plastic wrap. Refrigerate overnight, or as long as 24 hours. If you find yourself not being able to move forward with the recipe after 24 hours, another couple of hours or more isn’t going to hurt one bit.
- FOR THE FOCACCIA DOUGH – DAY 2
- When you’re reading to get going on the pizza, you’ve got a couple of choices:
- Choice #1: Spray a 13x9 inch pan (metal is best if you’ve got one) with cooking spray, and then drizzle a couple of tablespoons of oil onto the bottom of the pan and swirl around to cover the bottom. This will end up giving you a nice, crisp bottom crust. Scoop the dough into the pan and gently try to coax it into covering the entire bottom of the pan. If it wants to be stubborn, just walk away for five minutes or so and try again. The name of the game here is to be GENTLE. You don’t want to burst any of the nice air bubbles that have formed when the dough was rising overnight if you can help it. If the dough remains stubborn, just leave it as it is. This is a rustic recipe, so we won’t care one bit!
- Choice #2: In this choice, you’re going to make two pizzas. The dough will be much thinner and look more like a traditional pizza. First, tear off two pieces of parchment paper (or aluminum foil if you don’t have parchment paper) that are about 16 inches long. Sprinkle the parchment paper with cornmeal or flour to prevent the pizza from sticking. If you are using foil, spray it with kitchen spray before sprinkling with the cornmeal or flour. Divide the dough in approximately half, and scoop half of the dough onto each of the pieces of parchment paper or foil. Now…this next part is easiest if you oil your hands with olive oil…now gently push the dough into a circle that is approximately 12 – 16 inches in diameter. The 12-inch pizza will obviously be thicker and the 16 will be thinner. It’s entirely up to you which thickness you want to go for.
- Once your doughs have been formed, let them sit there all by themselves for about half an hour to come to room temperature and rise a little bit while you get your toppings ready. Preheat your oven to 450 degrees. If you are making the two pizzas, and if you have a baking stone, now is the time to put your baking stone in the oven to preheat. If you don’t have a baking stone, turn a cookie sheet upside down and preheat it for about 10 minutes before baking. Slide the pizza on to the baking sheet to bake.
- TO ASSEMBLE
- To assemble the focaccia pizza in a 13x9 inch pan: Start by dropping teaspoons of the crushed tomatoes over the top of the focaccia, just in a random pattern. If you’d rather use pesto than tomato sauce, go for it. If you’d like to use both, it would also be good. You choose.
- Sprinkle with about 1-2 tablespoons of your favorite herb blend (optional).
- Sprinkle the mozzarella cheese over the top of the sauce.
- Here’s how I topped my focaccia – but please do whatever you like best!! The only little secret here is that less is more. If you pile too much on top, your pizzas may not get baked all the way through. If you follow overall amounts listed above and substitute other toppings to add up to that volume of ingredients, you should be just fine. I added grilled onions and orange pepper, roasted red pepper, and green and kalamata olives. When all of that was added, I sprinkled on about a cup of shredded Machengo or parmesan cheese.
- To assemble the two pizzas, just follow the same process but divide the toppings up between the two pizzas.
- TO BAKE
- If you are making the pizza in a 13x9 inch pan, bake at 450 degrees for about 25 minutes. The pizza will be done when the pizza slightly browns on top and begins to pull away from the sides of the pan.
- If you are making two pizzas, you’ll have to bake them one at a time probably. These guys also take about 20 minutes. You can tell they are done be using a spatula to lift up and edge. The edge should come up easily and should look baked through and slightly tan in color. It’s hard to overbake, so err on the side of too long in the oven as opposed to not long enough.
- The focaccia pizza in the pan should set up for about 10 minutes before you remove it. Just get your spatula under an edge of the pan, tilt the pan and the whole thing should slide right out.
- The other pizzas can be eaten as soon as you can get your hands on them.