
Tomorrow being St. Patrick’s Day and all, I thought another traditional recipe might be the ever popular scone. But wait a second, let’s not forget our gluten-free friends and family members (or ourselves) on this festive day. You can whip up a bunch of these beauties, and serve them hot out of the oven, fragrant with herbs and oozing with melting cheese. No need to be stingy with the butter – it is a day of celebration after all. Top it off with a cold, refreshing pint of Guinness if that suits you. Your non-gluten friends won’t be able to tell the difference – they’re that good and that’s a promise.


You’ll need a gluten-free flour mix, and I’ve included the recipe I turn to each and every time America’s Test Kitchen Gluten-Free Flour Blend It’s from the geniuses at America’s Test Kitchen they are also the inspiration for this recipe. I make a ton of this mix and keep it in the freezer for any gluten-free cravings or other such emergencies. Get your dough together and cut into triangles. Make sure your cutting surface is sprayed well with cooking spray because these guys will have a tendency to stick. On to a parchment covered baking sheet, and – what the heck, sprinkled with an herb cheese blend which, by the way, will make the tops extra crispy when they come out of the oven and that is a very good thing


Pop them into a hot oven and then you only have about 14 minutes to wait.


Let them cool just a little bit. Stack em’ up if you like.

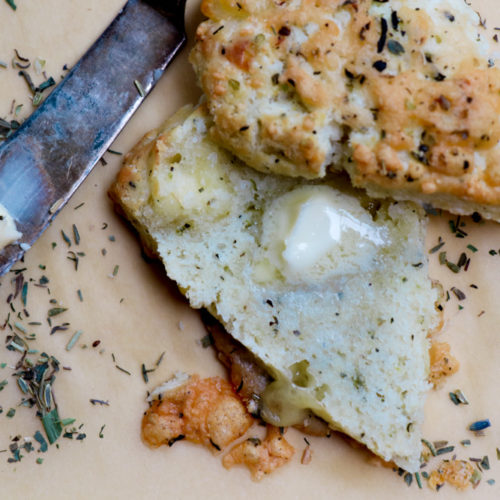
Grab the butter…


Need I say more? Have a lovely St. Patrick’s Day! xoxoxxo
Gluten-Free Jarlsberg & Herb Scones
Ingredients
- SCONES
- 7 ½ ounces 1 2/3 cup America’s Test Kitchen Gluten-Free Flour Blend – see recipe below
- 1- tablespoon baking powder
- ¼ teaspoon salt
- ¼ teaspoon xanthan gum
- 2 teaspoons dried herb mix of your choice
- 6 tablespoons cold butter cut into ¼ inch cubes
- ½ cup diced Jarlsberg cheese or cheese of your choice, cut into ¼ inch dice)
- 2/3- cup sour cream either full or reduced fat
- 1 large egg
- 1/3 cup grated cheese of your choice I use a Parmesan blend
- Additional 1 tsp. dried herb blend for topping
- AMERICA’S TEST KITCHEN GLUTEN-FREE FLOUR BLEND www.americastestkitchen.com
- 24 ounces 4 ½ cups plus ⅓ cup white rice flour
- 7 ½ ounces 1⅔ cups brown rice flour
- 7 ounces 1⅓ cups potato starch
- 3 ounces 3/4 cup tapioca starch
- 3 tablespoons nonfat milk powder optional
- Whisk together in a large bowl until well combined. Store in freezer for best freshness.
Instructions
- Heat oven to 500 degrees.
- While oven is heating, combine gluten-free flour blend, baking powder, salt, xanthan gum and 2 tsp. dried herbs into the bowl of a food processor. Pulse to blend.
- Add diced butter and pulse until mixture is the texture of fine crumbs with no butter pieces visible.
- Remove from food processor and place into large bowl. Toss in diced Jarlsberg.
- In a small bowl, stir together sour cream and egg. Mix into gluten-free and cheese mixture and stir until no dried flour is visible. Cover and set aside at room temperature for 30 minutes.
- While mixture is resting, get your baking sheets together. You will want to use two baking sheets, one on top of the other. This will prevent the scones from burning on the bottom due to the high heat of the oven. Place a sheet of parchment paper on the top baking sheet.
- After 30 minutes, place scone dough on a sheet of parchment that has been sprayed with cooking spray, or you can also spray a marble surface or cutting board with spray. This is to prevent the dough from sticking.
- Shape the dough into a 6-inch circle and cut into 6 pieces.
- Place the pieces on the parchment paper.
- Combine the 1/3 cup grated cheese and 1 tsp. dried herbs, and sprinkle over the top of the scones.
- Turn the oven temperature down to 425 degrees and bake about 14 minutes, topping has turned golden brown and interior cheese is melting.